OpenAIE 启蒙 使用说明文档
启蒙是OpenAIE系列模块

简介
- 供电方式:USB TypeC(DC: 5V)
- 处理器: K210,RISC-V 64 位双核 CPU,主频:400MHz;具备卷积人工神经网络硬件加速器 KPU,可高性能进行卷积人工神经网络运算。
- 存储:Flash:16MiB; SRAM:8MiB; 支持SD卡拓展
- 图像传感器:200万像素彩色摄像头
- 显示屏:2.0英寸,分辨率240*320,IPS全视角彩色显示屏
- 板载功能:
- 三颗可编程全彩LED
- 两颗白光LED
- 两个按键
- 无源蜂鸣器
- 三轴陀螺仪,三轴加速度计
- 光照强度传感器
- 非特定人语音识别模块
- 拓展接口:Grove(UART/I2C/GPIO)
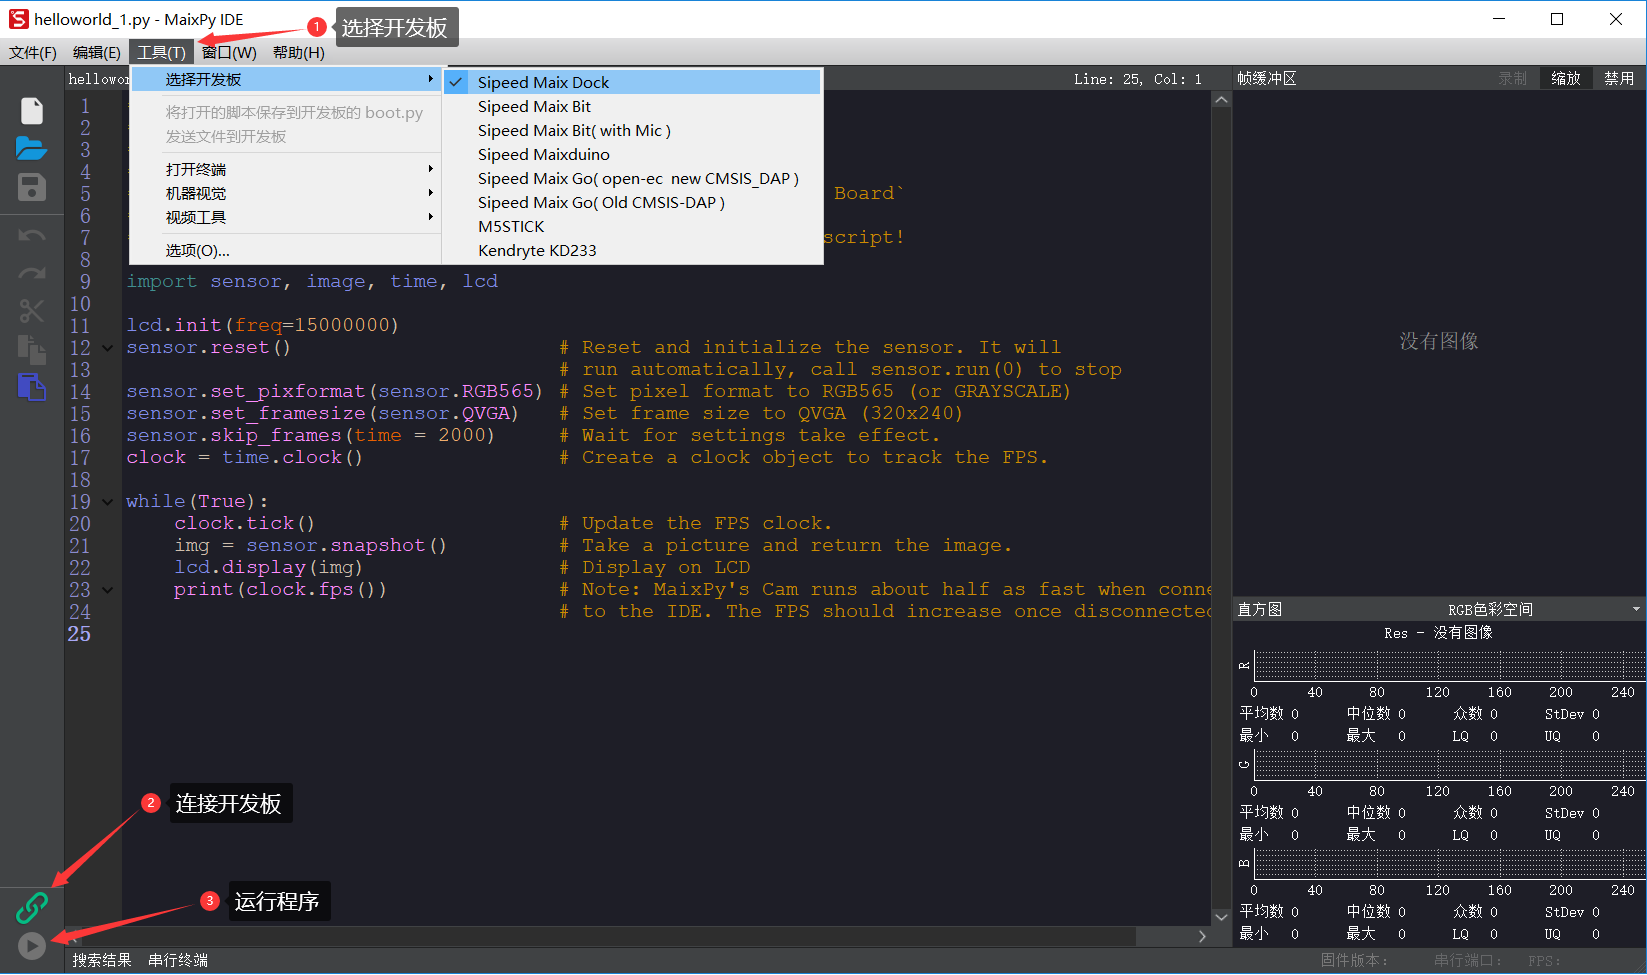
入门使用
点击下载 相关资料 提取码:3qo0 。
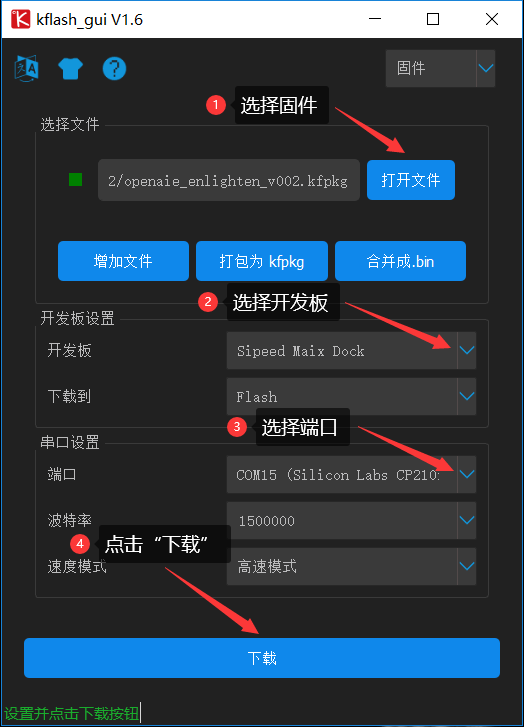
1. 驱动安装
开发板通过 UART 串口转 USB 连接电脑通信,因此需安装驱动 USB 转 UART 串口驱动。
进入资料下载链接,选择下载驱动(x64对应Windows 64位,x86对应Windows 32位)。打开exe文件安装。
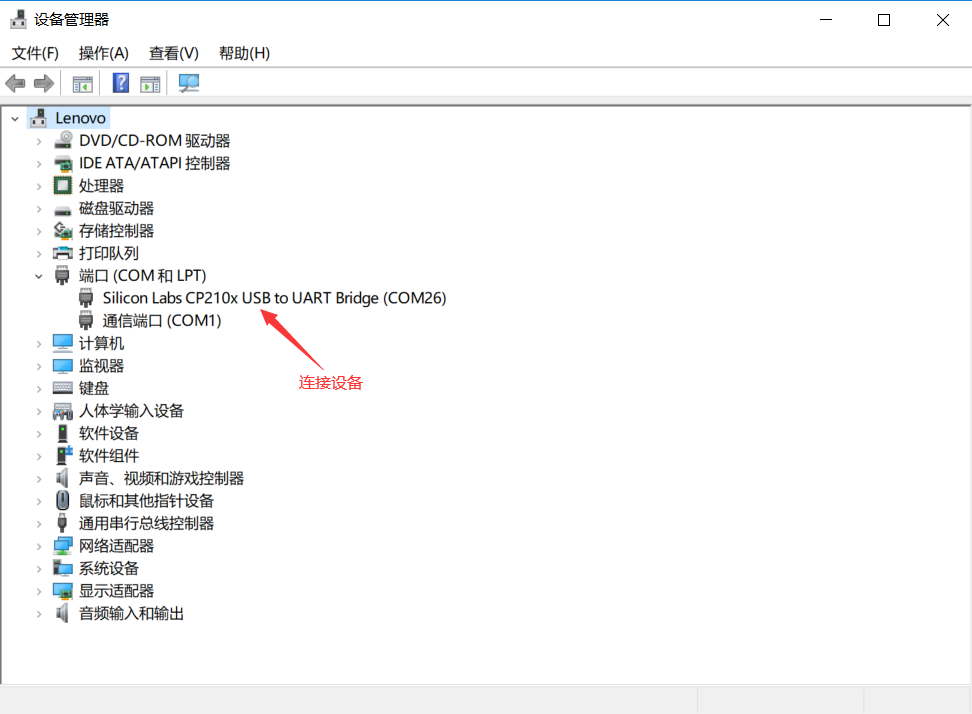
安装驱动后,通过USB数据线连接开发板,将鼠标移动到我的电脑,右键属性–>设备管理器–>端口(COM和LPT),可查看到设备连接信息,如下图所示:
板载功能
1. RGB LED
板载三颗RGB全彩LED,每种颜色可实现0~255共256级亮度调节,通过对红(Red)、绿(Green)、蓝(Blue)三个颜色通道的调节可叠加发出多种颜色的光。
设置 RGB LED 参数
'''
 id -- 板载灯编号,由左至右为:0,1,2;
 r, g, b -- 颜色亮度值,取值范围:0~255
'''
rgb.set(id, (r, g, b))

# 或:
color = (r, g, b)  # tuple类型
rgb.set(id, color)
将设置值输出显示
rgb.display()
Note
每种颜色的LED共有2^8=256(0~255)个发光等级,即共有2^8^3=16 777 216种颜色组合。通过查找 RGB颜色对照表 生成自己喜欢的颜色。
示例1:点亮LED
from openaie import rgb     # 导入模块

rgb.set(0, (5, 0, 0))       # 将第1个灯设置为红色亮度值为:5
rgb.set(1, (0, 10, 0))      # 将第2个灯设置为蓝色亮度值为:10
rgb.set(2, (0, 0, 20))      # 将第3个灯设置为绿色亮度值为:100
rgb.display()               # 输出显示
示例2:颜色渐变
RGB彩虹色渐变算法: https://www.cnblogs.com/wzdxy/p/5346930.html
import time
from openaie import rgb

def wheel(pos):
    # 通过改变在0和255之间的每个颜色参数产生彩虹色光谱
    # Input a value 0 to 255 to get a color value.
    # The colours are a transition r - g - b - back to r.
    if pos < 0 or pos > 255:
        r = g = b = 0
    elif pos < 85:
        r = int(pos * 3)
        g = int(255 - pos*3)
        b = 0
    elif pos < 170:
        pos -= 85
        r = int(255 - pos*3)
        g = 0
        b = int(pos*3)
    else:
        pos -= 170
        r = 0
        g = int(pos*3)
        b = int(255 - pos*3)
    return (r, g, b)

def rainbow_cycle(wait_ms):
    # 彩虹效果
    n=3
    for j in range(255):
        for i in range(n):
            pixel_index = (i * 256 // n) + j
            rgb.set(i, wheel(pixel_index & 255))
        rgb.display()
        time.sleep_ms(wait_ms)

while True:
    rainbow_cycle(10)
2. 白光 LED
后置两颗白光LED,可用于摄像头的背光灯等。可通过编程控制亮度。
Note
不能单独控制
设置灯亮度
'''
 brightness -- 亮度,取值范围: 0~100
'''
lamp.set(brightness)
示例1:呼吸灯
from openaie import lamp
import time

dir = True
while True:
    for i in range(80):
        if dir :
            lamp.set(i)
        else :
            lamp.set(100 - i)
        time.sleep(0.05)
    dir = not dir
3. 蜂鸣器
无源蜂鸣器,可通过不同频率的信号驱动,发出不同音调的声音。
蜂鸣器鸣响
'''
 freq -- 频率
 time_ms -- 时间,单位为:毫秒
'''
buzzer.tone(freq, time_ms)
关停蜂鸣器
buzzer.no_tone()
示例1:依次发出 Do、Re、Mi、Fa、Sol、La、Si
import time
from openaie import buzzer

tone_list = (289, 661, 700, 786, 882, 990, 1112)
for i in range(7):
    buzzer.tone(tone_list[i])
    time.sleep_ms(500)
buzzer.no_tone()
4. 按键
左右两个按键,按下接低电平,弹起接高电平。
获取按键状态
'''
 返回布尔值:
     按键按下 -- True
     按键弹起 -- False
'''
button_left.is_press()
button_right.is_press()
示例1:按键控制开关灯
import time
from openaie import*

while (True):
    if button_left.is_press(): # 检测到按键按下
        utime.sleep_ms(10)
        if button_left.is_press():
            print("left button press")
            lamp.set(20)
        while (button_left.is_press()) : # 等待按键释放
            pass
    if button_right.is_press(): # 检测到按键按下
        utime.sleep_ms(10)
        if button_right.is_press():
            print("right button press")
            lamp.set(0)
        while (button_right.is_press()) : # 等待按键释放
            pass
5. 光照强度传感器
光照强度传感器可检测光照强度,测量范围:1~65535lx(勒克斯)
读取光照强度
'''
 返回光照强度,单位:lx(勒克斯)
'''
light.read()
示例1:光控灯
import time
from openaie import light, lamp
while True:
    brightness = light.read()
    print("brightness: %d lx"%brightness)
    if brightness < 50:  # 当亮度小于一定值时,打开灯
        lamp.set(20)
    else :
        lamp.set(0)
    time.sleep_ms(100)
示例2:根据环境光强度调节显示屏亮度
import time, lcd
from openaie import *

lcd.init(freq=15000000, color=lcd.WHITE)
lcd.direction(lcd.YX_LRUD)
lcd.draw_string(105, 110, "hello enlighten", lcd.BLUE, lcd.WHITE)
while True:
    brightness = light.read()
    print(brightness)
    if brightness < 200:
        lamp.set_backlight(brightness*0.45 + 5)
    else:
        lamp.set_backlight(90)
    time.sleep_ms(50)
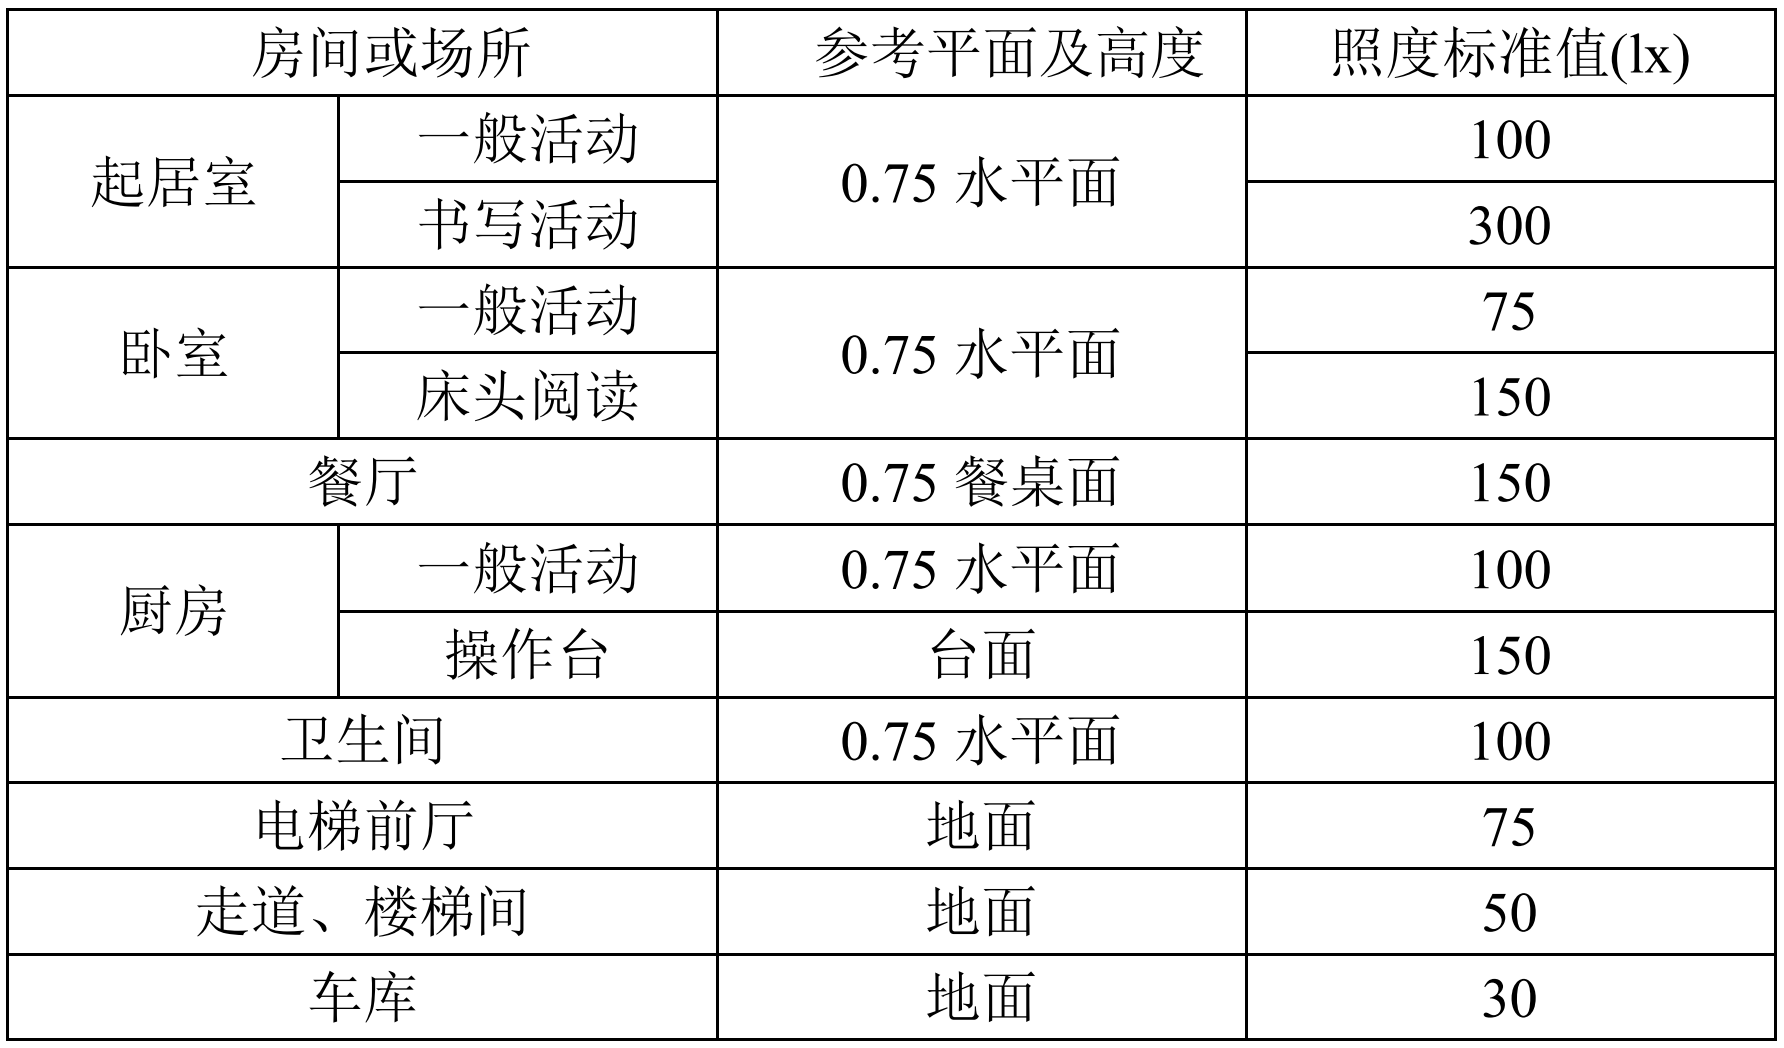
住宅建筑照明标准值
6. 姿态传感器
惯性测量单元含三轴加速度计和三轴陀螺仪。
编程方法:
'''
 读加速度,单位:m/s^2
 axis -- 'x', 'y', 'z'
'''
imu.read_accel(axis)

'''
 读角速度,单位:°/S
 axis -- 'x', 'y', 'z'
'''
imu.read_gryo(axis)

'''
 读姿态角(roll - 横滚角,pitch - 俯仰角,yaw - 偏航角)
 sel -- 'roll', 'pitch', 'yaw'
'''
# TODO...
# imu.read_attitude(sel)
示例1:数据读取显示
import time, lcd, image
from openaie import imu

lcd.init(freq=15000000, color=(0,0,0))
lcd.direction(lcd.YX_LRUD)

img = image.Image()
while True:
    img.clear()
    accel_x = imu.read_accel('x')
    accel_y = imu.read_accel('y')
    accel_z = imu.read_accel('z')
    gyro_x = imu.read_gyro('x')
    gyro_y = imu.read_gyro('y')
    gyro_z = imu.read_gyro('z')
    img.draw_arrow(160, 160, 230, 160, color=(200,0,0), thickness=2)
    img.draw_arrow(160, 160, 160, 90, color=(0,200,0), thickness=2)
    img.draw_arrow(160, 160, 110, 210, color=(0,0,200), thickness=2)
    img.draw_string(10, 10, ("accel x: %.1f m/s^2" % accel_x), color=(200,0,0), scale=1.5)
    img.draw_string(10, 30, ("accel y: %.1f m/s^2" % accel_y), color=(0,200,0), scale=1.5)
    img.draw_string(10, 50, ("accel z: %.1f m/s^2" % accel_z), color=(0,0,200), scale=1.5)
    img.draw_string(170, 10, ("gyro x: %d" % gyro_x), color=(200,0,0), scale=1.5)
    img.draw_string(170, 30, ("gyro y: %d" % gyro_y), color=(0,200,0), scale=1.5)
    img.draw_string(170, 50, ("gyro z: %d" % gyro_z), color=(0,0,200), scale=1.5)
    lcd.display(img)
    time.sleep_ms(100)
示例2:水平球
import time, sensor, image, lcd, math
from openaie import *

lcd.init(freq=15000000)
lcd.direction(lcd.YX_LRUD)

'''
 数值映射
 @param in_min, in_max 输入区间
 @param out_min, out_max 输出区间
'''
def math_map(input, in_min, in_max, out_min, out_max):
    output = (input-in_min)*(out_max-out_min)/(in_max-in_min) + out_min # 距离缩放 + 偏差
    return output

img = image.Image()
while True:
    accel_x = imu.read_accel('x')
    accel_y = imu.read_accel('y')
    cord_x = int(math_map(accel_x, (-9.8), 9.8, 100, -100))
    cord_y = int(math_map(accel_y, (-9.8), 9.8, -100, 100))
    img.clear()
    img.draw_circle(159, 119, 8, color=(0,0,255), thickness=2, fill=False)
    img.draw_circle(159, 119, 105, color=(0,0,255), thickness=2, fill=False)
    img.draw_circle(cord_x+159, cord_y+119, 7, color=(255,0,0), thickness=1, fill=True)
    dis = '(%.1f, %.1f)'%(accel_x, accel_y)
    img.draw_string(20, 20, dis, lcd.BLUE)
    lcd.display(img)
    if (math.fabs(accel_x) < 0.2) and (math.fabs(accel_y) < 0.2):
        rgb.set(1, (0,10,0))
    else:
        rgb.set(1, (0,0,0))
    rgb.display()
    time.sleep_ms(50)
示例3:相机水平参考线
import sensor, lcd, math, time
from openaie import*

lcd.init(freq=15000000)
lcd.direction(lcd.YX_LRUD)
sensor.reset()
sensor.set_hmirror(False)
sensor.set_vflip(False)
sensor.set_pixformat(sensor.RGB565)
sensor.set_framesize(sensor.QVGA)
sensor.run(1)

def trans(angle):
    cord_x_center = 160
    cord_y_center = 120
    radius = 65
    rad = angle #angle*math.pi / 180 # 转为弧度
    if angle>0:
        x0 = int(cord_x_center - radius*math.cos(rad))
        y0 = int(cord_y_center - radius*math.sin(rad))
        x1 = int(cord_x_center + radius*math.cos(rad))
        y1 = int(cord_y_center + radius*math.sin(rad))
        img.draw_line(x0, y0, x1, y1, color=(255,0,0), thickness=3)
    else:
        img.draw_line(95, 120, 225, 120, color=(0,255,0), thickness=3)

while True:
    img = sensor.snapshot()
    img.draw_line(50, 120, 90, 120, color=(0,255,0), thickness=3)
    img.draw_line(230, 120, 270, 120, color=(0,255,0), thickness=3)
    accel_x = imu.read_accel('x')
    accel_y = imu.read_accel('y')

    #angle_a = math.acos(accel_y/9.8)*180/math.pi # 转为角度
    angle_rad = math.acos(accel_y/9.8)
    angle = int(angle_rad*180/math.pi)
    if accel_x < 0:
        angle_rad = math.pi-angle_rad
    trans(angle_rad)

    print(angle)
    img.draw_string(12, 10, str(angle), color=(0,0,255), scale=2)
    lcd.display(img)
7. 语音识别
非特定人语音识别
复位语音识别模块
asr.reset()
添加识别关键词
'''
 str:识别语句的拼音
 ret: 识别到关键词时的返回值
'''
asr.add_cmd(str, ret)
开始运行
asr.run()
读取识别结果
asr.read_res()
Note
安静的环境中可获得较大的识别准确率
示例1:语音控制开关灯
from openaie import *
import time
asr.reset()
asr.add_cmd("hong", 1)       # 添加关键词“红”,返回值为:1
asr.add_cmd("lv", 2)         # 添加关键词“绿”,返回值为:2
asr.add_cmd("lan", 3)        # 添加关键词“蓝”,返回值为:3
asr.add_cmd("kai deng", 4)   # 添加关键词“开灯”,返回值为:4
asr.add_cmd("guan deng", 5)  # 添加关键词“关灯”,返回值为:5
asr.run()

def asr_test(sel):
    if sel == 1 :
        print("red")
        rgb.set(0, (20, 0, 0))
        rgb.display()
    elif sel == 2 :
        print("green")
        rgb.set(0, (0, 20, 0))
        rgb.display()
    elif sel == 3 :
        print("blue")
        rgb.set(0, (0, 0, 20))
        rgb.display()
    elif sel == 4 :
        print("turn on the light")
        lamp.set(10)
    elif sel == 5 :
        print("turn off the light")
        lamp.set(0)
        rgb.set(0, (0, 0, 0))
        rgb.display()

while True:
    asr_test(asr.read_res())
    time.sleep_ms(100)
示例2:增加语音唤醒设置
import time, random
from openaie import *

asr_run = False
res_str = ('我在', '你说......', '诶!', '来啦', '嗨!')

asr.reset()
asr.add_cmd("hong", 1)                  # 添加关键词“红”,返回值为:1
asr.add_cmd("lv", 2)                    # 添加关键词“绿”,返回值为:2
asr.add_cmd("lan", 3)                   # 添加关键词“蓝”,返回值为:3
asr.add_cmd("kai deng", 4)              # 添加关键词“开灯”,返回值为:4
asr.add_cmd("guan deng", 5)             # 添加关键词“关灯”,返回值为:5
asr.add_cmd("xiao ming tong xue", 66)   # 唤醒词
asr.add_cmd("tui xia", 65)              # 退出
asr.run()

def asr_test(sel):
    global asr_run
    if sel == 66:
        asr_run = True
        rgb.set(1, (0, 20, 0))
        rgb.display()
        print(res_str[random.randint(0, 4)])
    elif sel == 65:
        asr_run = False
        rgb.set(1, (0, 0, 0))
        rgb.display()
        print("=========== END ===========")
    if asr_run == True:
        if sel == 1 :
            print("red")
            rgb.set(0, (20, 0, 0))
            rgb.display()
        elif sel == 2 :
            print("green")
            rgb.set(0, (0, 20, 0))
            rgb.display()
        elif sel == 3 :
            print("blue")
            rgb.set(0, (0, 0, 20))
            rgb.display()
        elif sel == 4 :
            print("turn on the light")
            lamp.set(10)
        elif sel == 5 :
            print("turn off the light")
            lamp.set(0)
            rgb.set(0, (0, 0, 0))
            rgb.display()

while True:
    asr_test(asr.read_res())
    time.sleep_ms(100)
8. 液晶显示屏
显示原理 参数 IPS全视角 分辨率:240*320(QVGA)
编程方法:
'''
 初始化
'''
lcd.init(freq=15000000, color=lcd.BLACK)

'''
 设置背光亮度
 brightness:0~100
'''
lcd.set_backlight(brightness)

'''
 显示字符
'''
lcd.draw_string(80, 100, "hello enlighten", lcd.RED, lcd.BLACK)

'''
 显示图片
'''
lcd.display(image, roi=Auto)

'''
 清空显示
'''
lcd.clear()

'''
 设置显示方向 0 1 2 3
'''
lcd.rotation()

'''
 是否镜像显示
 invert -- True or False
'''
lcd.mirror(invert)
示例1:字符串,图片显示
# TODO...
# from openaie import *
9. 摄像头
原理
传感器参数:200万像素(OV2640)
编程方法:
'''
 重置并初始化摄像头
'''
sensor.reset()

'''
 启动或关闭捕获图像功能
 enable -- True or False
'''
sensor.run(enable)

'''
 设置帧大小
 framesize -- sensor.QVGA, sensor.QQVGA
'''
sensor.set_framesize(framesize)

'''
 设置帧格式
 format -- sensor.RGB565, sensor.GRAYSCALE
'''
sensor.set_pixformat(format)

'''
 拍照
'''
sensor.snapshot()

'''
 跳帧
'''
sensor.skip_frames([n,time])

'''
 设置对比度
'''
sensor.set_contrast(contrast)

'''
 设置亮度
'''
sensor.set_brightness(brightness)

'''
 设置饱和度
'''
sensor.set_saturation(saturation)

'''
 自动增益
 enable -- True or False
'''
sensor.set_auto_gain(enable, gain_db)

'''
 设置水平镜像
 enable -- True or False
'''
sensor.set_hmirror(enable)

'''
 设置垂直反转
 enable -- True or False
'''
sensor.set_vflip(enable)
示例1:视频拍摄显示
import sensor,lcd

lcd.init(freq=15000000)
lcd.direction(lcd.YX_LRUD)
sensor.reset()
sensor.set_hmirror(False)
sensor.set_vflip(False)
sensor.set_pixformat(sensor.RGB565)
sensor.set_framesize(sensor.QVGA)
sensor.run(1)
sensor.skip_frames(30)

while True:
    img = sensor.snapshot()
    lcd.display(img)
综合测试程序
from openaie import*
import sensor, image, time, lcd

lcd.init(freq=15000000)
lcd.direction(lcd.YX_LRUD)
sensor.reset()
sensor.set_hmirror(False)
sensor.set_vflip(False)
sensor.set_pixformat(sensor.RGB565)
sensor.set_framesize(sensor.QVGA)
sensor.skip_frames(time = 100)

object_detection.set_object('20class')
lables_list = ['aeroplane', 'bicycle', 'bird', 'boat', 'bottle',
               'bus', 'car', 'cat', 'chair', 'cow',
               'diningtable', 'dog', 'horse', 'motorbike', 'person',
               'pottedplant', 'sheep', 'sofa', 'train', 'tvmonitor']


asr.add_cmd("hong", 1)       # 添加关键词“红”,返回值为:1
asr.add_cmd("lv", 2)         # 添加关键词“绿”,返回值为:2
asr.add_cmd("lan", 3)        # 添加关键词“蓝”,返回值为:3
asr.add_cmd("kai deng", 4)   # 添加关键词“开灯”,返回值为:4
asr.add_cmd("guan deng", 5)  # 添加关键词“关灯”,返回值为:5
asr.run()

def asr_test(sel):
    if sel == 1 :
        print("red")
        rgb.set(0, (20, 0, 0))
        rgb.display()
    elif sel == 2 :
        print("green")
        rgb.set(0, (0, 20, 0))
        rgb.display()
    elif sel == 3 :
        print("blue")
        rgb.set(0, (0, 0, 20))
        rgb.display()
    elif sel == 4 :
        print("turn on the light")
        lamp.set(10)
    elif sel == 5 :
        print("turn off the light")
        lamp.set(0)
        rgb.set(0, (0, 0, 0))
        rgb.display()

tone_list = (289, 661, 700, 786, 882, 990, 1112)
for i in range(7):
    buzzer.tone(tone_list[i])
    time.sleep_ms(500)
buzzer.no_tone()

color = {0:(10,0,0), 1:(0,10,0), 2:(0,0,10), 3:(0,0,0)}
for i in range(4):
    for j in range(3):
        rgb.set(j, color[i])
    rgb.display()
    time.sleep_ms(500)

lamp.set_backlight(20)

while True:
    img = sensor.snapshot()
    code = object_detection.get_res_from(img)
    if code:
        for item in code:
            img.draw_rectangle(item.rect())
            text = '%s %.1f%%' % (lables_list[item.classid()], (item.value()*100))
            img.draw_string(item.x(), item.y(), text, color=(255,0,0), scale=1.5)

    brightness = light.read()
    img.draw_string(10, 80, ("brightness: %.1f lx" % brightness), color=(200,200,0), scale=1.5)
    if brightness < 200:
        lamp.set_backlight(brightness*0.45 + 5)
    else:
        lamp.set_backlight(90)

    accel_x = imu.read_accel('x')
    accel_y = imu.read_accel('y')
    accel_z = imu.read_accel('z')
    gyro_x = imu.read_gyro('x')
    gyro_y = imu.read_gyro('y')
    gyro_z = imu.read_gyro('z')
    img.draw_string(10, 10, ("accel x: %.1f m/s^2" % accel_x), color=(200,0,0), scale=1.5)
    img.draw_string(10, 30, ("accel y: %.1f m/s^2" % accel_y), color=(0,200,0), scale=1.5)
    img.draw_string(10, 50, ("accel z: %.1f m/s^2" % accel_z), color=(0,0,200), scale=1.5)
    img.draw_string(170, 10, ("gyro x: %d" % gyro_x), color=(200,0,0), scale=1.5)
    img.draw_string(170, 30, ("gyro y: %d" % gyro_y), color=(0,200,0), scale=1.5)
    img.draw_string(170, 50, ("gyro z: %d" % gyro_z), color=(0,0,200), scale=1.5)

    if button_left.is_press(): # 检测到按键按下
        utime.sleep_ms(10)
        if button_left.is_press():
            print("left button press")
            lamp.set(20)
        while (button_left.is_press()) : # 等待按键释放
            pass
    if button_right.is_press(): # 检测到按键按下
        utime.sleep_ms(10)
        if button_right.is_press():
            print("right button press")
            lamp.set(0)
        while (button_right.is_press()) : # 等待按键释放
            pass

    asr_test(asr.read_res())
    lcd.display(img)
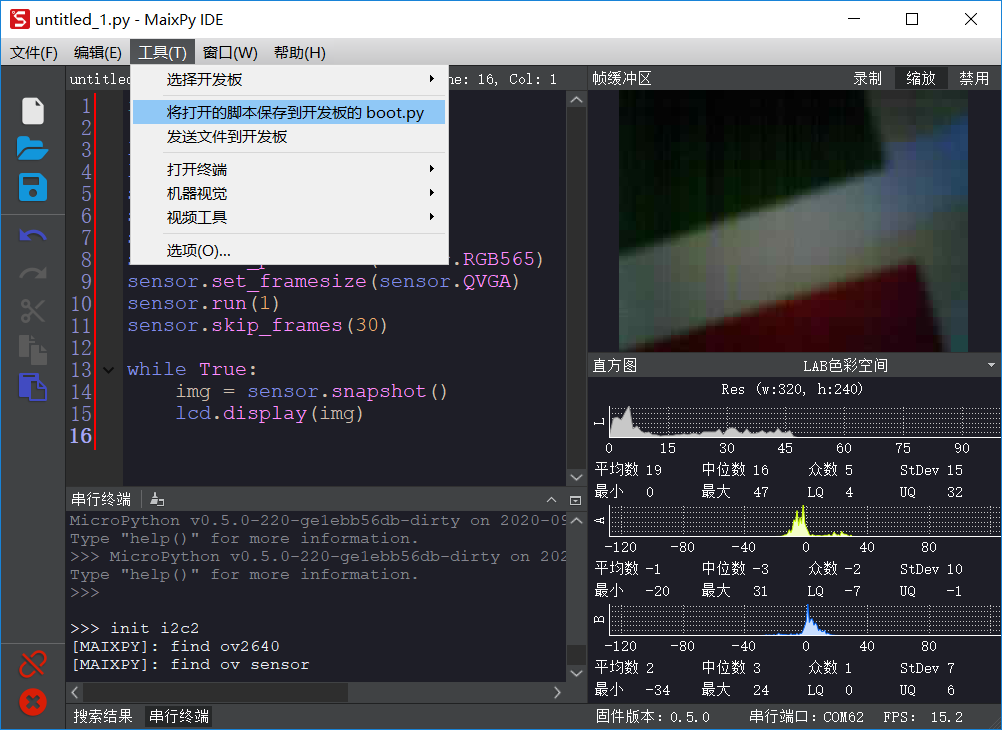
机器视觉
图像
创建返回 image 对象
'''
  Creates a new image object from a file at path. Alternatively, you may pass a width, height, and either sensor.BINARY, sensor.GRAYSCALE, or sensor.RGB565 to create new blank image object (initialized to 0 - black).
'''
class image.Image(path[, copy_to_fb=False]) # Supports bmp/pgm/ppm/jpg/jpeg image files.
保存图像
'''
 Saves a copy of the image to the filesystem at path.
'''
image.save(path[, roi[, quality=50]])
清空图像
'''
 image Sets all pixels in the image to zero (very fast).
'''
image.clear([mask])
示例1:图像保存与打开
# TODO...
绘图
画字符串
'''
 x0, y0, x1, y1 -- 起点终点位置
 text -- 字符串,单个字符尺寸为:8*10像素
 color -- 颜色,color=(r_val, g_val, b_val),r_val, g_val, b_val取值范围:0~255
 scale -- 字体缩放
'''
image.draw_string(x, y, text, color, scale=1)
画线
'''
 x0, y0, x1, y1 -- 起点终点位置
 color -- 颜色,color=(r_val, g_val, b_val),r_val, g_val, b_val取值范围:0~255
 thickness -- 线宽
'''
image.draw_line(x0, y0, x1, y1, color, thickness=1)
画圆形
'''
 x, y -- 圆心位置
 color -- 颜色,color=(r_val, g_val, b_val),r_val, g_val, b_val取值范围:0~255
 thickness -- 线宽
 fill -- 填充
'''
image.draw_circle(x, y, radius, color, thickness=1, fill=False)
画矩形
'''
 x, y -- 起点位置
 w, h -- 宽和高
 color -- 颜色,color=(r_val, g_val, b_val),r_val, g_val, b_val取值范围:0~255
 thickness -- 线宽
 fill -- 填充
'''
image.draw_rectangle(x, y, w, h, color, thickness=1, fill=False)
画十字
'''
 x, y --  中心位置
 color -- 颜色,color=(r_val, g_val, b_val),r_val, g_val, b_val取值范围:0~255
 size -- 大小
 thickness -- 线宽
'''
image.draw_cross(x, y, color, size=5, thickness=1)
画箭头
'''
 x0, y0, x1, y1 -- 起点终点位置
 color -- 颜色,color=(r_val, g_val, b_val),r_val, g_val, b_val取值范围:0~255
 thickness -- 线宽
'''
image.draw_arrow(x0, y0, x1, y1, color, thickness=1)
示例1:基础绘图测试
import lcd, image

lcd.init(freq=15000000, color=0x0000)

# 创建一个空白图像,在图像上绘图,显示
img = image.Image()
img.draw_string(10, 10, "Enlighten", color=(0,0,100), scale=1)
img.draw_line(100, 200, 200, 200, color=(0,100,100), thickness=1)
img.draw_rectangle(80, 70, 60, 60, color=(0,100,0), thickness=1, fill=False)
img.draw_circle(220, 100, 30, color=(100,0,0), thickness=1, fill=False)
img.draw_cross(80, 180, color=(100,0,0), size=10, thickness=1)
img.draw_arrow(20, 150, 60, 200, color=(0,100,100), thickness=1)
lcd.display(img)
颜色识别
LAB颜色阈值
- L – 亮度
- A – 从绿色到红色的分量
- B – 从蓝色到黄色的分量
识别色块
'''
 识别色块, 返回 image.blob 对象 List
 roi -- roi = [x0, y0, x1, y1] 左上角坐标(x0,y0),右下角坐标(x1,y1)
 thresholds -- LAB颜色阈值 (l_min, l_max, a_min, a_max, b_min, b_max)
 x_stride -- x方向上检测最小宽度像素值,小于此范围的blob不检测
 y_stride -- y方向上检测最小宽度像素值,小于此范围的blob不检测
'''
image.find_blobs([thresholds])
image.find_blobs(thresholds, roi=Auto, x_stride=2, y_stride=1, invert=False, area_threshold=10, pixels_threshold=10, merge=False, margin=0, threshold_cb=None, merge_cb=None)
Blob对象方法(class image.blob)
'''
 Returns a list of 4 (x,y) tuples of the 4 corners of the object.
'''
blob.corners()

'''
 返回矩形框参数
'''
blob.rect()     # tuple (x, y, w, h)
blob.x()        # 矩形框起点坐标x
blob.y()        # 矩形框起点坐标y
blob.w()        # 矩形框的宽度
blob.h()        # 矩形框的高度
blob.cx()       # 矩形框中心点坐标x
blob.cy()       # 矩形框中心点坐标y

'''
 返回色块内像素点
'''
blob.pixels()
阈值设置
方法一:IDE:工具–>机器视觉–>阈值编辑器,按需求选择图像来源。移动滑块至目标检测区域调节为白色,其他区域为黑色,复制“LAB阈值”,如下图所示:
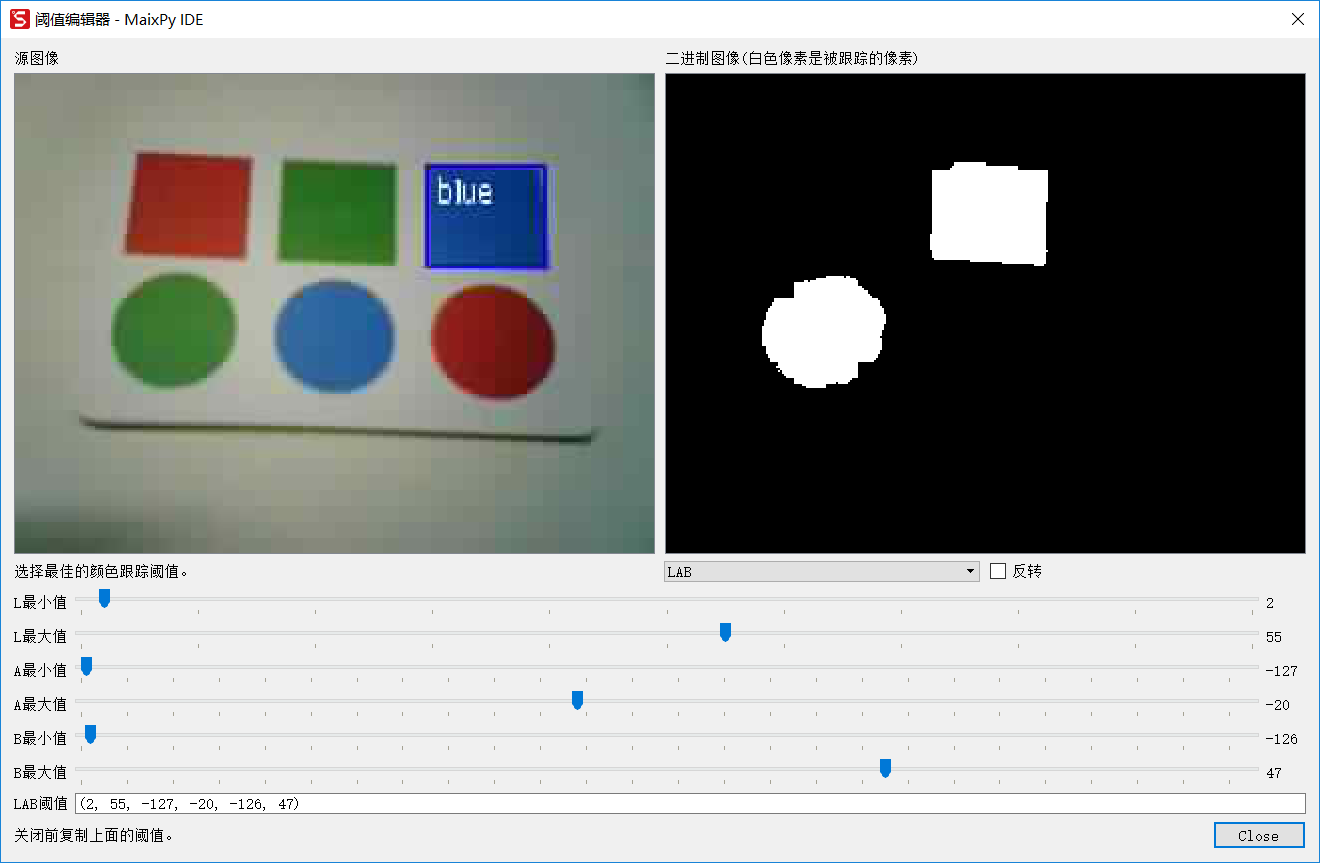
方法二:在IDE右下方的“直方图”中选择“LAB颜色空间”,在图像缓冲区中的目标区域点按鼠标拖拽,根据直方图信息填写“LAB阈值”,如下图所示:
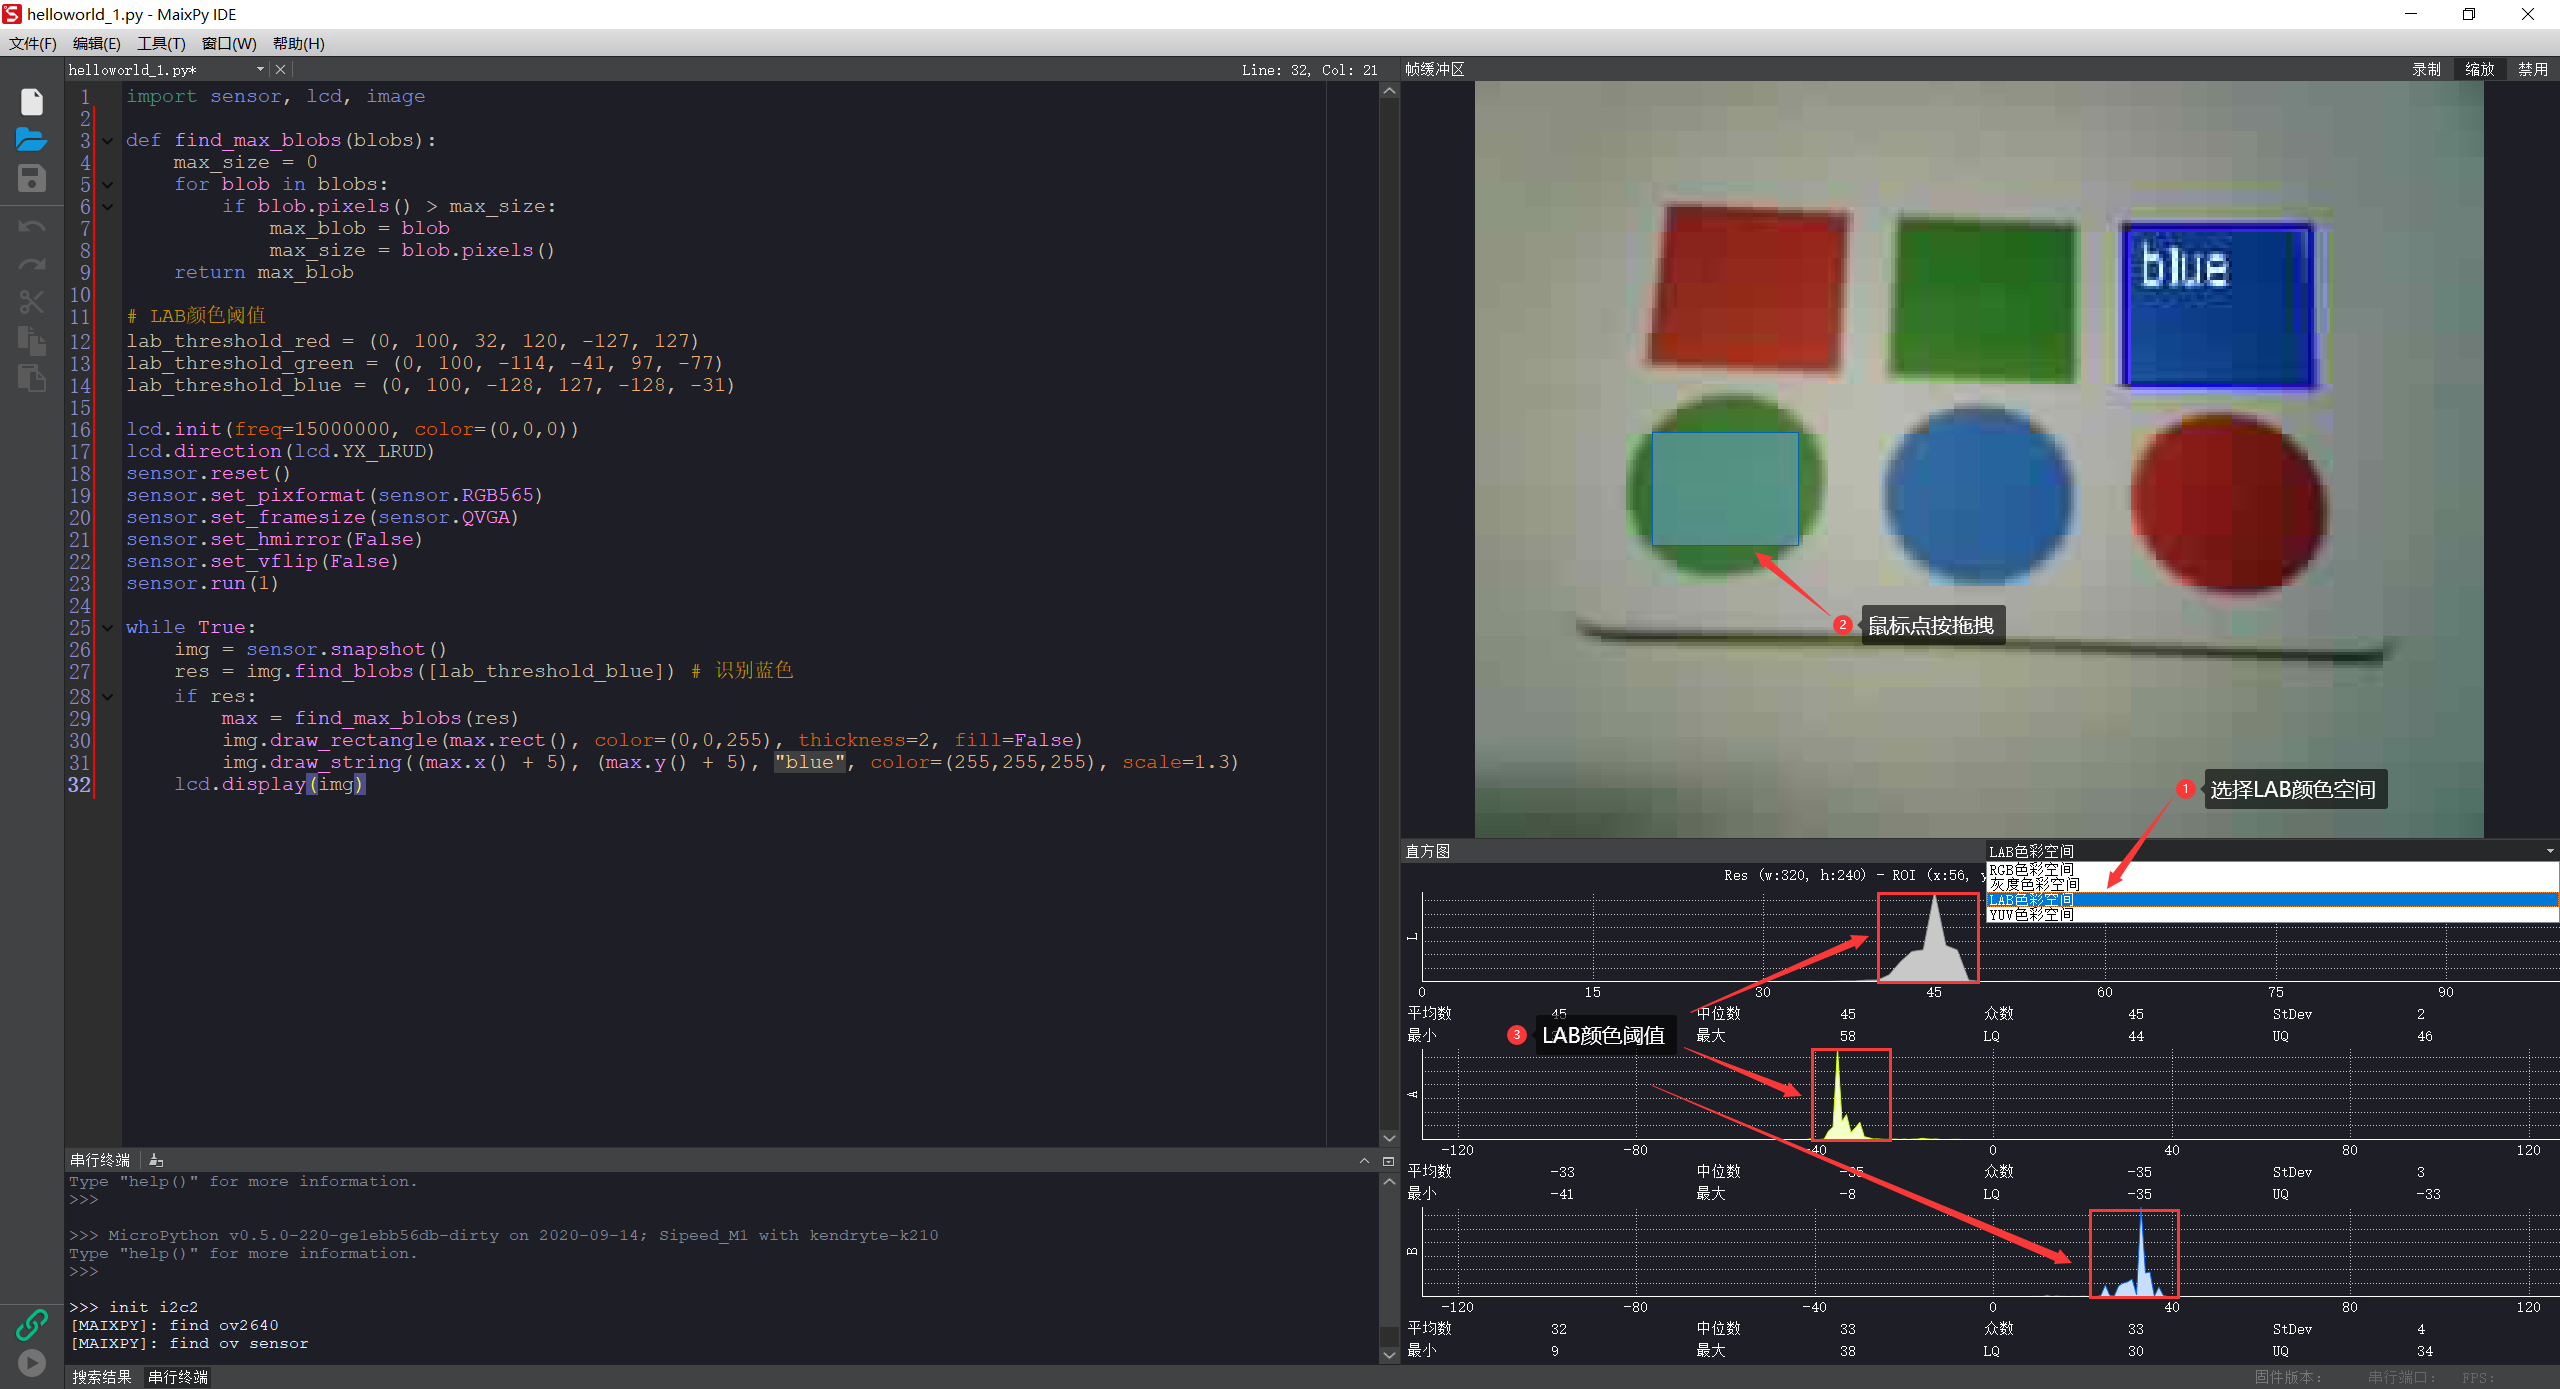
Note
可在配图区域鼠标右键,选择“在新标签页中打开图片”查看大图。
示例1:寻找最大的色块
import sensor, lcd, image

def find_max_blobs(blobs):
    max_size = 0
    for blob in blobs:
        if blob.pixels() > max_size:
            max_blob = blob
            max_size = blob.pixels()
    return max_blob

# LAB颜色阈值
lab_threshold_red = (0, 100, 32, 120, -127, 127)
lab_threshold_green = (0, 100, -114, -41, 97, -77)
lab_threshold_blue = (0, 100, -128, 127, -128, -31)

lcd.init(freq=15000000, color=(0,0,0))
lcd.direction(lcd.YX_LRUD)
sensor.reset()
sensor.set_pixformat(sensor.RGB565)
sensor.set_framesize(sensor.QVGA)
sensor.set_hmirror(False)
sensor.set_vflip(False)
sensor.run(1)

while True:
    img = sensor.snapshot()
    res = img.find_blobs([lab_threshold_blue]) # 识别蓝色
    if res:
        max = find_max_blobs(res)
        img.draw_rectangle(max.rect(), color=(0,0,255), thickness=2, fill=False)
        img.draw_string((max.x() + 5), (max.y() + 5), "blue", color=(255,255,255), scale=1.3)
    lcd.display(img)
形状识别
识别矩形
'''
 识别矩形,返回 image.rect 对象 List
 threshold -- 识别阈值
'''
image.find_rects(roi=Auto, threshold=10000)
Rectangle对象方法(class image.rect)
'''
 返回矩形四个角的位置 (x,y) tuples of the 4 corners of the object.
'''
rect.corners()

'''
 返回矩形相关信息
'''
rect.rect() # tuple (x, y, w, h)
rect.x()    # 矩形框起点坐标x
rect.y()    # 矩形框起点坐标y
rect.w()    # 矩形框的宽度
rect.h()    # 矩形框的高度

'''
 Returns the rectangle’s magnitude.
'''
rect.magnitude()
示例1:识别矩形并作标注
import sensor, image, lcd

lcd.init(freq=15000000)
lcd.direction(lcd.YX_LRUD)
sensor.reset()
sensor.set_hmirror(False)
sensor.set_vflip(False)
sensor.set_pixformat(sensor.RGB565)
sensor.set_framesize(sensor.QQVGA)
sensor.run(1)

while(True):
    img = sensor.snapshot()
    for r in img.find_rects(threshold = 20000):                     # 识别矩形,阈值 20000
        img.draw_rectangle(r.rect(), color = (255, 0, 0))           # 画出矩形,颜色为红色
        for r_c in r.corners():                                     # 找出矩形的四个角
            img.draw_circle(r_c[0], r_c[1], 5, color = (0, 255, 0)) # 四个角顺时针画圆
        print(r)
    lcd.display(img)
识别圆形
'''
 识别圆形,返回 image.circle 对象 List
 threshold -- 识别阈值
 r_min -- 检测圆的最小半径
 r_max -- 检测圆的最大半径
'''
image.find_circles(roi, threshold=2000, r_min=2, r_max)
Circle对象方法(class image.circle)
'''
 返回圆相关信息
'''
circle.x()  # 圆心位置x
circle.y()  # 圆心位置y
circle.r()  # 圆的半径

'''
 Returns the circle’s magnitude.
'''
circle.magnitude()
示例1:识别圆形并作标注
import sensor, image, lcd

lcd.init(freq=15000000)
lcd.direction(lcd.YX_LRUD)
sensor.reset()
sensor.set_hmirror(False)
sensor.set_vflip(False)
sensor.set_pixformat(sensor.RGB565)
sensor.set_framesize(sensor.QQVGA) # sensor.QVGA 速度慢
sensor.run(1)

while(True):
    img = sensor.snapshot()
    for c in img.find_circles(threshold = 2500, r_min = 2, r_max = 100):
        img.draw_circle(c.x(), c.y(), c.r(), color = (255, 255, 0))
        print(c)
    lcd.display(img)
二维码识别
识别二维码
'''
 返回 image.qrcode 对象 List
'''
image.find_qrcodes()
QRcode对象方法(class image.qrcode)
'''
 返回二维码字符串
'''
qrcode.payload()

'''
 返回二维码边界框参数
'''
qrcode.rect() # tuple (x, y, w, h)
qrcode.x()    # 矩形框起点坐标x
qrcode.y()    # 矩形框起点坐标y
qrcode.w()    # 矩形框的宽度
qrcode.h()    # 矩形框的高度
示例1:扫描,显示二维码信息
import sensor, image, lcd

lcd.init(freq=15000000)
lcd.direction(lcd.YX_LRUD)
sensor.reset()
sensor.set_hmirror(False)
sensor.set_vflip(False)
sensor.set_pixformat(sensor.RGB565)
sensor.set_framesize(sensor.QVGA)
sensor.run(1)
sensor.skip_frames(30)

while True:
    img = sensor.snapshot()
    res = img.find_qrcodes()
    if len(res) > 0:
        img.draw_string(10, 10, res[0].payload(), color=(0,0,128), scale=2)
        print(res[0].payload()) # 打印 res[0](第一个二维码) 的信息
    lcd.display(img)
AprilTag识别
识别 AprilTag 标签
# Finds all apriltags within the roi and returns a list of image.apriltag objects. Please see the image.apriltag object for more information.
'''
 返回 image.apriltag 对象 List
 families -- image.TAG16H5, image.TAG25H7, image.TAG25H9,
             image.TAG36H10, image.TAG36H11, image.ARTOOLKIT
'''
image.find_apriltags(families=image.TAG36H11)
AprilTag对象方法(class image.apriltag)
'''
 Returns a list of 4 (x,y) tuples of the 4 corners of the object.
'''
apriltag.corners()

'''
 返回矩形框参数
'''
apriltag.rect() # tuple (x, y, w, h)
apriltag.x()    # 矩形框起点坐标x
apriltag.y()    # 矩形框起点坐标y
apriltag.w()    # 矩形框的宽度
apriltag.h()    # 矩形框的高度
apriltag.cx()   # 矩形框中心点坐标x
apriltag.cy()   # 矩形框中心点坐标y

'''
 返回标签ID
'''
apriltag.id()

'''
 Returns the numeric family of the apriltag.
'''
apriltag.family()

'''
 Returns the quality of the apriltag image (0.0 - 1.0) where 1.0 is the best.
'''
apriltag.goodness()
示例1:AprilTag识别标注
import sensor, image, math, lcd

lcd.init(freq=15000000)
lcd.direction(lcd.YX_LRUD)
sensor.reset()
sensor.set_pixformat(sensor.RGB565)
sensor.set_framesize(sensor.QQVGA) # we run out of memory if the resolution is much bigger...
sensor.set_vflip(0)
sensor.set_hmirror(0)
sensor.skip_frames(time = 2000)
sensor.run(True)

while(True):
    img = sensor.snapshot()
    for tag in img.find_apriltags(families=image.TAG16H5):
        img.draw_rectangle(tag.rect(), color = (255, 0, 0))
        img.draw_cross(tag.cx(), tag.cy(), color = (0, 255, 0))
        tag_info =  "Tag ID: %d, rotation %d (degrees)" %  (tag.id(), (180 * tag.rotation()) / math.pi)
        print(tag_info)
    lcd.display(img)
Haar级联分类器
https://github.com/opencv/opencv/tree/master/data/haarcascades
https://github.com/openmv/openmv/tree/master/ml/haarcascade
https://blog.csdn.net/weixin_38391911/article/details/80516809
Haar级联分类器,多个不同的特征检测器组合
人脸检测
# 导入相关库
import lcd, sensor, time, image

# 初始化
lcd.init(freq=15000000)
lcd.direction(lcd.YX_LRUD)
sensor.reset()
sensor.set_contrast(1)
sensor.set_gainceiling(16)
sensor.set_vflip(0)
sensor.set_hmirror(0)
sensor.set_framesize(sensor.QVGA)
sensor.set_pixformat(sensor.GRAYSCALE) # 人脸检测只能用灰度图

# 加载 “人脸检测” 的Haar级联分类器
face_cascade = image.HaarCascade("frontalface", stages=25)

clock = time.clock()
while (True):
    clock.tick()
    img = sensor.snapshot() # 获取图像
    objects = img.find_features(face_cascade, threshold=0.75, scale=1.35) # 检测人脸
    # 将检测到的每个结果用矩形框标注
    for r in objects:
        img.draw_rectangle(r)
    lcd.display(img)
    print(clock.fps())
人眼检测
# 导入相关库
import lcd, sensor, time, image

# 初始化
lcd.init(freq=15000000)
lcd.direction(lcd.YX_LRUD)
sensor.reset()
sensor.set_contrast(1)
sensor.set_gainceiling(16)
sensor.set_vflip(0)
sensor.set_hmirror(0)
sensor.set_framesize(sensor.QVGA)
sensor.set_pixformat(sensor.GRAYSCALE)

# 加载 "人眼" 的Haar级联分类器
eye_cascade = image.HaarCascade("eye", stages=24)

while (True):
    clock.tick()
    img = sensor.snapshot() # 获取图像
    objects = img.find_features(eye_cascade, threshold=0.75, scale=1.35) # 检测人眼
    # 将检测到的每个结果用矩形框标注
    for r in objects:
        img.draw_rectangle(r)
    lcd.display(img)
卷积变换
卷积运算
'''
 图像卷积运算
 size -- (((size*2)+1)x((size*2)+1) == 卷积核大小)  --> 3x3==1, 5x5==2, 7x7==3, etc.
 kernel -- 卷积核
'''
image.morph(size, kernel)
示例1:突出图像轮廓
sensor, image, time, lcd

lcd.init(freq=15000000)
lcd.direction(lcd.YX_LRUD)
sensor.reset()
sensor.set_hmirror(False)
sensor.set_vflip(False)
sensor.set_pixformat(sensor.RGB565)
sensor.set_framesize(sensor.QVGA)
sensor.skip_frames(time = 500)

kernel_size = 1 # 3x3==1, 5x5==2, 7x7==3, etc.

# 卷积核,提取图像垂直边缘特征
conv1 = [1, 2, 1, \
         0, 0, 0, \
         -1, -2, -1]
# 卷积核,提取图像水平边缘特征
conv2 = [-1, 0,  1, \
         -2, 0,  2, \
         -1, 0,  1]
# 卷积核,提取图像轮廓
conv3 = [0, 1, 0, \
         1, -4, 1, \
         0, 1, 0]

clock = time.clock()
while(True):
    clock.tick()
    img = sensor.snapshot()
    img.morph(kernel_size, conv3)
    lcd.display(img)
    print(clock.fps())
艺术风格变换
旋转校正
'''
 旋转矫正
'''
import sensor, image, time, lcd

X_ROTATION_DEGREE_RATE = 5
Y_ROTATION_DEGREE_RATE = 0.5
Z_ROTATION_DEGREE_RATE = 0
X_OFFSET = 0
Y_OFFSET = 0

ZOOM_AMOUNT = 1 #lower zoom out - higer zoom in
FOV_WINDOW = 60

lcd.init(freq=15000000)
lcd.direction(lcd.YX_LRUD)
sensor.reset()                      # 重置并初始化传感器
sensor.set_hmirror(False)
sensor.set_vflip(False)
sensor.set_pixformat(sensor.RGB565) # 将像素格式设置为RGB565(或GREYSCALE)
sensor.set_framesize(sensor.QVGA)   # 将帧大小设置为QVGA(320x240)
sensor.skip_frames(time = 1000)
clock = time.clock()

x_rotation_counter = 0
y_rotation_counter = 0
z_rotation_counter = 0
while(True):
    clock.tick()
    img = sensor.snapshot()
    img.rotation_corr(x_rotation = x_rotation_counter, \
                                          y_rotation = y_rotation_counter, \
                                          z_rotation = z_rotation_counter, \
                                          x_translation = X_OFFSET, \
                                          x_translation = Y_OFFSET, \
                                          zoom = ZOOM_AMOUNT, \
                                          fov = FOV_WINDOW)

    x_rotation_counter += X_ROTATION_DEGREE_RATE
    y_rotation_counter += Y_ROTATION_DEGREE_RATE
    z_rotation_counter += Z_ROTATION_DEGREE_RATE
    lcd.display(img)
    print(clock.fps())
卡通风格变换
'''
 风格变换
'''
import sensor, image, time, lcd

lcd.init(freq=15000000)
lcd.direction(lcd.YX_LRUD)
sensor.reset()                      # 重置并初始化传感器
sensor.set_hmirror(False)
sensor.set_vflip(False)
sensor.set_pixformat(sensor.RGB565) # 将像素格式设置为RGB565(或GREYSCALE)
sensor.set_framesize(sensor.QVGA)   # 将帧大小设置为QVGA(320x240)
sensor.skip_frames(time = 1000)     # 等待设置生效
clock = time.clock()                # 创建一个时钟对象以跟踪FPS

while True:
    clock.tick()
    # seed_threshold控制着色区域的最大区域增长。 将其放大会合并更多像素。
    # floating_threshold控制增长区域时的最大像素到像素的差异。设置高的值将快速组合图像中的所有像素。你应该使其小一些。
    # cartoon() 将增长同时两个限制都满足的区域...
    img = sensor.snapshot()
    img.cartoon(seed_threshold=0.3, floating_thresholds=0.3)
    lcd.display(img)
    print(clock.fps())  # 注意:连接到IDE时,OpenAIE Cam的运行速度大约是后者的一半。
极坐标变换
'''
 极坐标变换
'''
import sensor, image, time, lcd

lcd.init(freq=15000000)
lcd.direction(lcd.YX_LRUD)
sensor.reset()                      # 重置并初始化传感器
sensor.set_hmirror(False)
sensor.set_vflip(False)
sensor.set_pixformat(sensor.RGB565) # 将像素格式设置为RGB565(或GREYSCALE)
sensor.set_framesize(sensor.QVGA)   # 将帧大小设置为QVGA(320x240)
sensor.skip_frames(time = 2000)
clock = time.clock()

while(True):
    clock.tick()
    #img = sensor.snapshot()
    #img = sensor.snapshot().lens_corr(strength=1.8).linpolar(reverse = True)#图像从笛卡尔坐标到线性极坐标重新投影,设置 reverse = True 可以在相反的方向重新投影,线性极坐标重新投影将图像旋转转换为x平移。
    #img = sensor.snapshot().lens_corr(strength=1.8).linpolar(reverse = False)
    #img = sensor.snapshot().lens_corr(strength=1.8).logpolar(reverse = True)#图像从笛卡尔坐标到对数极坐标重新投影。
    #img = sensor.snapshot().lens_corr(strength=1.8).logpolar(reverse = False)

    #img = sensor.snapshot().lens_corr(strength=1.8).linpolar(reverse = True).logpolar(reverse = True)
    #img = sensor.snapshot().lens_corr(strength=1.8).linpolar(reverse = True).logpolar(reverse = False)
    #img = sensor.snapshot().lens_corr(strength=1.8).linpolar(reverse = False).logpolar(reverse = True)
    #img = sensor.snapshot().lens_corr(strength=1.8).linpolar(reverse = False).logpolar(reverse = False)

    #img = sensor.snapshot().lens_corr(strength=1.8).logpolar(reverse = True).linpolar(reverse = True)
    #img = sensor.snapshot().lens_corr(strength=1.8).logpolar(reverse = True).linpolar(reverse = False)
    #img = sensor.snapshot().lens_corr(strength=1.8).logpolar(reverse = False).linpolar(reverse = True)
    img = sensor.snapshot()
    img.lens_corr(strength=1.8).logpolar(reverse = False).linpolar(reverse = False)
    lcd.display(img)
    print(clock.fps())
鱼眼校正和图像缩放
人工智能
在openaie固件中内置有部分模型
1. 图像分类
TODO…
2. 目标检测
导入目标检测模块
from openaie import object_detection
设置检测目标
'''
 obj -- 'face', 'mask', '20class', ...
'''
object_detection.set_object(obj)
获取检测结果
'''
 img -- 输入图像
 返回识别结果:
     object_detection.classid() -- 分类结果
     object_detection.value() -- 可信度(0~1)
     object_detection.rect() -- 边界框(x, y, w, h)
'''
object_detection.get_res_from(img)
示例1:人脸检测
import sensor, image, lcd
from openaie import object_detection

# 相关模块初始化
lcd.init(freq=15000000)
lcd.direction(lcd.YX_LRUD)
sensor.reset()
sensor.set_hmirror(False)
sensor.set_vflip(False)
sensor.set_pixformat(sensor.RGB565)
sensor.set_framesize(sensor.QVGA)
# 开始运行
sensor.run(1)
# 设置检测目标为“人脸”
object_detection.set_object('face')

while(True):
    img = sensor.snapshot()
    code = object_detection.get_res_from(img)
    if code:
        print(len(code))
        for item in code:
            img.draw_rectangle(item.rect())
            text = 'face %.1f%%'% (item.value()*100)
            img.draw_string(item.x(), item.y(), text, color=(0,255,0), scale=1)
    lcd.display(img)
示例2:口罩检测
import sensor, image, lcd, time
from openaie import object_detection

# 颜色定义
color_r = (255, 0, 0)
color_g = (0, 255, 0)
color_b = (0, 0, 255)

# 相关模块初始化
lcd.init(freq=15000000)
lcd.direction(lcd.YX_LRUD)
sensor.reset()
sensor.set_hmirror(False)
sensor.set_vflip(False)
sensor.set_pixformat(sensor.RGB565)
sensor.set_framesize(sensor.QVGA)
# 传感器开始运行
sensor.run(1)
# 设置检测目标为“口罩”
object_detection.set_object('mask')

clock = time.clock()
while (True):
    clock.tick()
    img = sensor.snapshot()
    code = object_detection.get_res_from(img)
    if code:
        num_res = len(code)
        for item in code:
            confidence = float(item.value()) # 可信度
            item_rol = item.rect()           # 边界框参数
            class_id = int(item.classid())   # 分类结果
            # 识别可信度较低,不判断是否戴口罩
            if confidence < 0.52:
                img.draw_rectangle(item_rol, color=color_b, tickness=4)
            # 戴口罩
            if class_id == 1 and confidence > 0.65:
                img.draw_rectangle(item_rol, color_g, tickness=4)
                if num_res == 1:
                    text = 'mask %.1f%%'% (confidence*100)
                    img.draw_string(10, 5, text, color=color_g, scale=2)
            # 没有戴口罩
            else:
                img.draw_rectangle(item_rol, color=color_r, tickness=4)
                if num_res == 1:
                    text = 'no mask %.1f%%'% (confidence*100)
                    img.draw_string(10, 5, text, color=color_r, scale=2)
    lcd.display(img)
    print(clock.fps())
示例3:20分类检测(飞机,自行车,小鸟,船,瓶子,公共汽车,小车,猫,椅子,牛,餐桌,狗,马,摩托车,人,花盆,羊,沙发,火车,电视)
import sensor, image, lcd, time
from openaie import object_detection

# 相关模块初始化
lcd.init(freq=15000000)
lcd.direction(lcd.YX_LRUD)
sensor.reset()
sensor.set_hmirror(False)
sensor.set_vflip(False)
sensor.set_pixformat(sensor.RGB565)
sensor.set_framesize(sensor.QVGA)
# 传感器开始运行
sensor.run(1)
# 设置检测目标为“20分类”
object_detection.set_object('20class')

lables_list = ['aeroplane', 'bicycle', 'bird', 'boat', 'bottle',
               'bus', 'car', 'cat', 'chair', 'cow',
               'diningtable', 'dog', 'horse', 'motorbike', 'person',
               'pottedplant', 'sheep', 'sofa', 'train', 'tvmonitor']

while(True):
    img = sensor.snapshot()
    code = object_detection.get_res_from(img)
    if code:
        for item in code:
            img.draw_rectangle(item.rect())
            text = '%s %.1f%%' % (lables_list[item.classid()], (item.value()*100))
            img.draw_string(item.x(), item.y(), text, color=(255,0,0), scale=1.5)
    lcd.display(img)